The autumn leaves from crepe paper is romantic and beautiful. Today Camellia Bees will show how to make simple it with some easy steps. Let’s DIY with me.
Table of contents
Materials for making autumn leaves
Before starting, gather all the necessary materials:
- Crepe paper 180gsm or 140 gsm
- White floral wire
- Glue or Hot glue gun
- Floral tape
- Scissors
- Ruler
- Color pen
Make sure you have enough crepe paper to create multiple leaves, as well as extra in case of mistakes.
Step- by- step guide for making autumn leaves
There are many types of leaves, but in this article, Camellia Bees shows you two simple ways for beginners.
Now, let do it!!!
Type 01: Yellow autumn leaves by crepe paper

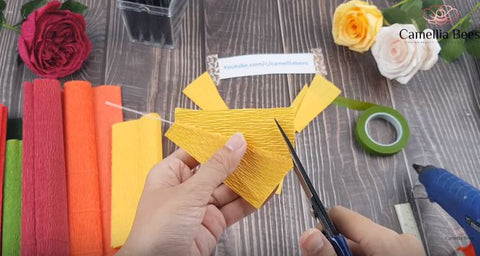
Cut a piece of yellow crepe with the size of 8.7 cm * 6cm, then cut the piece of paper into 2 triangular pieces as shown below.

Then glue the long sides of the two halves and fix them to the white floral wire. Use scissors to make the paper leaf shape.
Finally, use an orange-red pen to accentuate each autumn leaves, so you’ve completed a paper yellow autumn leaf that looks like real. It is too easy, isn’t it.
Type 02: Maple autumn leaves by crepe paper

Similar to how to make paper yellow autumn leaves above, you need to cut red crepe paper with the following size and quantity:
- 11.0cm * 3.3cm – 1 piece
- 9.2cm * 3.3cm – 2 pieces
- 7.5cm * 3.3cm – 2 pieces
- 6.0cm * 1.7cm – 2 pieces

Then cut the piece of paper into 2 triangular pieces as shown below. After that glue the long sides of the two halves and fix them to the white floral wire. Use scissors to make the paper leaf shape.

Using red floral tape to wrap the wings together symmetrically along with the largest leaf, we will complete the beautiful autumn maple leaf with crepe paper.
Tips for making perfect autumn leaves
To make the leaves look more authentic, add veins using the pencil or pen. Draw a line down the center of each leaf, then smaller lines branching off from it.
Aim for autumn leaves natural look
The veins should not be too thick or too thin – aim for a natural look. If unsure how many veins to add, take a look at real autumn leaves for inspiration
Use different colors for autumn leaves
For a more realistic effect, use different colors for the veins. A darker shade of the leaf color works well.
Don’t forget the stem of autumn leaves
Don’t forget to add a stem to each leaf. This can be a simple line or a more detailed shape, depending on the style of the drawing.
Alternative materials for stems of autumn leaves
If pipe cleaners are not available, other materials can be used to attach stems to leaves.
Some options include:
- Floral wire
- Thin twigs
- Toothpicks.
However, it is important to note that these alternative materials may not provide the same level of flexibility and adjustability as pipe cleaners.
Finally adjust the autumn leaves
After all the stems have been attached, take a moment to adjust the position and shape of the leaves as needed. This is the final step before the leaves are ready to be used in any desired craft or decoration.
To follow more details to step by step to make the paper autumn leaf. Please click and watch the video below. Hopefully, with the instructions from Camellia Bees, you can complete a beautiful paper flower to decorate or make a gift for your friends or relatives.
If you like my instructions, don’t forget to click like, share and subscribe to my channel.
SUBSCRIBE TODAY: https://www.youtube.com/c/camelliabees?sub_confirmation=1
FIND ME ON SOCIAL MEDIA:
Instagram: https://www.instagram.com/camelliabeeshandmade/
Facebook: https://www.facebook.com/camelliabeeshandmade/
Pinterest: https://www.pinterest.com/camelliabees/
CHECK OUT MY PAPER FLOWERS SHOP ON AMAZON:
https://amzn.to/2XNHmNA
Some other easy handmade flower making guides you might like. Click on the link and see the instructions.


