Posted on Leave a comment

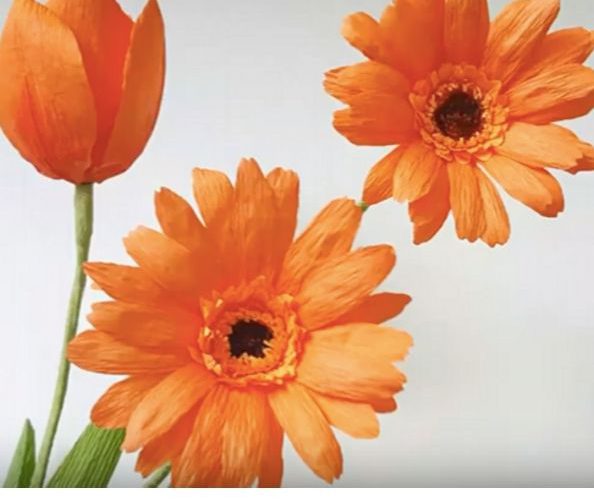
How to make paper Gerbera Daisy flower from crepe paper

Making paper Gerbera Daisy flower from crepep paper is not difficult, so today Camellia Bees will show you how to make it. Follow my step by step tutorials to make them quickly and easily.

1. Materials for making paper Gerbera Daisy flower from crepe paper

It’s important to choose high-quality crepe paper that is easy to work with. You can find crepe paper at your local craft store or online. Besides, you also need some other materials:

  • Scissors and ruler
  • Tacky Glue or Hot Glue gun
  • Floral Wires
  • Crepe paper
  • Markers

Make sure you prepare everythings that you need to make perfect paper Gerbera Daisy flower.

2. Step by step guide for making paper Gerbera Daisy flower

Let’s see how to make these easy crepe paper Gerbera Daisy flower with full stem and leaves. So easy paper DIY for all of you. Step by step tutorial for crepe paper flower making – do it yourself.

2.1. Step 1: Pistil of paper Gerbera Daisy flower:

Prepare paper samples with the following dimensions:

  • 1 pcs: 2cmx15cm
  • 2 pcs: 2.5cmx15
  • 1 pcs: 3cmx15cm
  • 1 pcs: 6cmx20cm

Let’s start making the pistil of paper Gerbera Daisy flower.

For the first paper template (2cmx15cm), use a markers to highlight the top of the paper and then cut the thread. If the stigma is not black, use a brush to finish painting after it is rolled into trunk.

In the 2nd layer of flowers, you use both of the paper samples to be a little bigger (2.5cmx15cm) and cut the petal pattern as shown in the picture.


Paste the two layers of petals you just cut into the stamens with the glue and you will complete the pistil of paper Gerbera Daisy flower.

2.2. Step 2: Petals of paper Gerbera Daisy flower

Use crepe paper with darker tones that you have prepared for the largest size (6cmx20cm) to cut petals. Then do the same and paste them into the pistil. Repeat this step to make many petals of paper Gerbera Daisy flower.

2.3. Step 3: Calyx of paper Gerbera Daisy flower

Use light green crepe paper to make sepals with the head slightly cut. The last thing is to simply paste them into the flower and you’re done.


To follow more details to step by step making paper Gerbera Daisy flower, please click and watch the video below. Hopefully, with the instructions from Camellia Bees, you can complete a beautiful paper flower to decorate or make a gift for your friends or relatives. Let’s try it !!!!

3. Tip for perfect paper Gerbera Daisy flower

When making paper flowers, it’s important to use sharp scissors to ensure clean cuts on your crepe paper. Experiment with different color combinations to create unique flowers that stand out. Remember that practice makes perfect handmade flowers, so don’t be discouraged if your first few attempts aren’t perfect.

3.1. Be gentle and use a toothpick to make paper Gerbera Daisy flower

Working with delicate crepe paper can be tricky, so be gentle to avoid tearing. If you’re having trouble shaping the petals, try using a toothpick to gently curl the edges. This can help you achieve the perfect shape and give your paper Gerbera Daisy flower more realistic look. Working with delicate crepe paper can be tricky, so be gentle to avoid tearing.

3.2. Use thin and flexible floral wire to make paper Gerbera Daisy flower

When it comes to floral wire, it’s best to use wire that is thin and flexible for easier manipulation. This will make it easier to shape your paper Gerbera Daisy flower and create the desired look.

3.3. Add Extra Details and Sparkle

Don’t be afraid to add extra details like small dots or lines with a marker or paintbrush. This can add depth and texture to your paper Gerbera Daisy flower. Consider adding a touch of glitter or metallic paint to your flowers for added sparkle and shine.

3.4. Store your paper Gerbera Daisy flower properly

Once you’ve finished your paper flowers, it’s important to store them properly to prevent damage. Store them in a dry, cool place to prevent them from getting damaged or crushed. This will help ensure that your paper Gerbera Daisy flower look beautiful for years to come.

  • Use sharp scissors to ensure clean cuts
  • Experiment with different color combinations
  • Be gentle when working with delicate crepe paper
  • Use thin and flexible floral wire
  • Add extra details like small dots or lines
  • Consider adding a touch of glitter or metallic paint
  • Store your finished flowers in a dry, cool place
  • Remember to have fun and let your creativity shine when making paper flowers.

With these tips and tricks, you’ll be able to create beautiful, unique flowers that will impress everyone who sees them.

Posted on Leave a comment

How to make simple autumn leaves from crepe paper

The autumn leaves from crepe paper is romantic and beautiful. Today Camellia Bees will show how to make simple it with some easy steps. Let’s DIY with me.

Materials for making autumn leaves

Before starting, gather all the necessary materials:

  • Crepe paper 180gsm or 140 gsm
  • White floral wire
  • Glue or Hot glue gun
  • Floral tape
  • Scissors
  • Ruler
  • Color pen

Make sure you have enough crepe paper to create multiple leaves, as well as extra in case of mistakes.

Step- by- step guide for making autumn leaves

There are many types of leaves, but in this article, Camellia Bees shows you two simple ways for beginners.

Now, let do it!!!

Type 01: Yellow autumn leaves by crepe paper

how-to-make-simple-autumn-leaf-from-crepe-paper-craft-tutorial-1

Cut a piece of yellow crepe with the size of 8.7 cm * 6cm, then cut the piece of paper into 2 triangular pieces as shown below.
how-to-make-simple-autumn-leaf-from-crepe-paper-craft-tutorial-2
Then glue the long sides of the two halves and fix them to the white floral wire. Use scissors to make the paper leaf shape.

how-to-make-simple-autumn-leaf-from-crepe-paper-craft-tutorial-3

Finally, use an orange-red pen to accentuate each autumn leaves, so you’ve completed a paper yellow autumn leaf that looks like real. It is too easy, isn’t it.

Type 02: Maple autumn leaves by crepe paper

how-to-make-simple-autumn-leaf-from-crepe-paper-craft-tutorial-4

Similar to how to make paper yellow autumn leaves above, you need to cut red crepe paper with the following size and quantity:

  • 11.0cm * 3.3cm – 1 piece
  • 9.2cm * 3.3cm –  2 pieces
  • 7.5cm * 3.3cm –  2 pieces
  • 6.0cm * 1.7cm –  2 pieces

how-to-make-simple-autumn-leaf-from-crepe-paper-craft-tutorial-5

Then cut the piece of paper into 2 triangular pieces as shown below. After that glue the long sides of the two halves and fix them to the white floral wire. Use scissors to make the paper leaf shape.

how-to-make-simple-autumn-leaf-from-crepe-paper-craft-tutorial-6

Using red floral tape to wrap the wings together symmetrically along with the largest leaf, we will complete the beautiful autumn maple leaf with crepe paper.

Tips for making perfect autumn leaves

To make the leaves look more authentic, add veins using the pencil or pen. Draw a line down the center of each leaf, then smaller lines branching off from it.

Aim for autumn leaves natural look

The veins should not be too thick or too thin – aim for a natural look. If unsure how many veins to add, take a look at real autumn leaves for inspiration

Use different colors for autumn leaves

For a more realistic effect, use different colors for the veins. A darker shade of the leaf color works well.

Don’t forget the stem of autumn leaves

Don’t forget to add a stem to each leaf. This can be a simple line or a more detailed shape, depending on the style of the drawing.

Alternative materials for stems of autumn leaves

If pipe cleaners are not available, other materials can be used to attach stems to leaves.

Some options include:

  • Floral wire
  • Thin twigs
  • Toothpicks.

However, it is important to note that these alternative materials may not provide the same level of flexibility and adjustability as pipe cleaners.

 Finally adjust the autumn leaves

After all the stems have been attached, take a moment to adjust the position and shape of the leaves as needed. This is the final step before the leaves are ready to be used in any desired craft or decoration.

To follow more details to step by step to make the paper autumn leaf. Please click and watch the video below. Hopefully, with the  instructions from Camellia Bees, you can complete a beautiful paper flower to decorate or make a gift for your friends or relatives.

If you like my instructions, don’t forget to click like, share and subscribe to my channel.

SUBSCRIBE TODAY: https://www.youtube.com/c/camelliabees?sub_confirmation=1

FIND ME ON SOCIAL MEDIA:

Instagram: https://www.instagram.com/camelliabeeshandmade/

Facebook: https://www.facebook.com/camelliabeeshandmade/

Pinterest: https://www.pinterest.com/camelliabees/

CHECK OUT MY PAPER FLOWERS SHOP ON AMAZON:

https://amzn.to/2XNHmNA

Some other easy handmade flower making guides you might like. Click on the link and see the instructions.

1. Paper Lotus Flower

2. Carnation Paper Flower

3. Paper Lily Flowers


Posted on Leave a comment

How To Make Morning Glory Flower From Crepe Paper

Today, Camellia Bees shows you how to make a morning glory flower from crepe paper. Easy way to make step by step a realistic paper morning glory flower. Take it easy to make!

 Materials for making morning glory flower

To make crepe paper morning glory flower, you will need the following materials:

  • Scissors
  • Floral Tape
  • Tacky Glue or Hot Glue gun
  • Floral Wires
  • 140gsm or 180gsm crepe paper.

All these materials are easily available at any craft store or online. Once you have all the necessary items, it’s time to get started on making your gorgeous blooms.

Step- by- steps guide for making morning glory flower

Now, let start making morning glory flower with Camellia Bees!

Step 01: Petals of paper morning glory flower

Cut 5 pieces of purple crepe paper, 5 pieces of white crepe paper with the size of 3cm * 7cm as shown below.

how-to-make-paper-morning-glory-ipomoea-flowers-from-crepe-paper-1Then paste two purple-white paper pieces on top of each other to make the petals harder.

how-to-make-paper-morning-glory-ipomoea-flowers-from-crepe-paper-2

Then cut 5 pieces of 7cm long triangle paper to make veins. Cover the finished triangle with glue and glue the wire to the center of the petal of paper morning glory.

how-to-make-paper-morning-glory-ipomoea-flowers-from-crepe-paper-3

Stick 5 petals of paper morning glory flower together.

Step 02: Trunk of paper morning glory flower

Use brown floral tap to wrap full trunk.how-to-make-paper-morning-glory-ipomoea-flowers-from-crepe-paper-4Flick the petals to create the most realistic paper flower.

Step 03: Finish paper morning glory flower

Glue them to the bottom of the flower to create leaves. And then you repeat this process with different shades of blue crepe paper to create multiple flowers. Arrange the morning glory flower in a vase or use them to decorate wreaths, garlands, or gift boxes

Tips for making perfect morning glory flower

Creating crepe paper morning glory flowers can be a fun and rewarding craft project. To make your flowers look more realistic and detailed, here are some tips:

Use different shades of blue crepe paper for morning glory flower

Using different shades of blue crepe paper can add depth and dimension to your morning glory flower. Try using a lighter shade for the center of the flower and gradually darker shades for the outer petals.

Cut slits in different widths of morning glory flower

Cutting the slits in different widths can create a more natural look for your flowers. Vary the width of the slits to make the petals look more organic and less uniform.

  • Tip: Try cutting some slits all the way to the center of the morning glory flower and others only halfway to create a more varied look.

Use green crepe paper for leaves of morning glory flower

Using green crepe paper to create leaves of varying sizes and shapes can add realism to your morning glory flower. Cut the leaves in different sizes and shapes to make them look more natural.

Add small details for morning glory flower

Adding small details like veins on the leaves or speckles on the petals with a fine-tipped marker can make your morning glory flower look more realistic. Take your time and add these details carefully for the best effect.

  • Tip: Use a light touch when adding details to avoid making your flowers look too busy or cluttered.

Curl the edges of the morning glory flower’s petals

Curling the edges of the petals slightly can give your morning glory flower a more realistic look. Use your fingers or a pencil to curl the edges of the petals outward for a natural, organic look.

Ways to decorate mornig glory flower

Centerpieces and wreaths with morning glory flower

One creative way to use handmade crepe paper morning glory flower is to create a centerpiece by arranging the flowers in a vase or jar filled with water or faux moss.

  • Another option is to make a wreath by attaching the flowers to a circular foam base using floral wire and hot glue.
  • These centerpieces and wreaths can add a pop of color and texture to any room or event.

Gift boxes and accessories with morning glory flower

Another way to incorporate these morning glory flower is to decorate gift boxes by gluing the flowers onto the lids or tying them around the box with ribbon. They can also be attached to hair clips, headbands, or brooches for a unique accessory. These flowers can add a personal touch to any gift or outfit.

Table decorations with morning glory flower

Finally, the flowers can be used as table decorations at weddings, showers, or other special events. They can be scattered on the table or arranged in a vase or jar. The morning glory flower can add a touch of elegance and whimsy to any event.

To follow more details to step by step to make the paper morning glory flower. Please click and watch the video below. Hopefully, with the above easy instructions, you can complete a beautiful paper flower to decorate or make a gift on valentine’s day craft, Mother day craft, Easter craft, Christmas decoration. Let’s try it !!!!

If you like my instructions, don’t forget to click like, share and subscribe to my channel.

SUBSCRIBE TODAY: https://www.youtube.com/c/camelliabees?sub_confirmation=1

FIND ME ON SOCIAL MEDIA:

Instagram: https://www.instagram.com/camelliabeeshandmade/

Facebook: https://www.facebook.com/camelliabeeshandmade/

Pinterest: https://www.pinterest.com/camelliabees/

CHECK OUT MY PAPER FLOWERS SHOP ON AMAZON:

https://amzn.to/2XNHmNA

Some other easy handmade flower making guides you might like. Click on the link and see the instructions.

1. Paper Lily Flower

2. Paper Gerbera Flower


Posted on Leave a comment

How to make crepe paper sunflower

Today, Camellia Bees will guide you step by step to make a paper sunflower from crepe paper. With some easy materials, you can make beautiful and useful products by yourself. 

Materials for making crepe paper sunflower

To make a crepe paper sunflower, it is important to gather all the necessary supplies and materials beforehand. You will need the following materials:

  • Crepe paper 140gsm or 180gsm (Italian Crepe paper)
  • Floral wire 16 gauge green, brown and yellow
  • Floral tape
  • Hot glue gun
  • Scissors
  • Marker pen

Once you have gathered all the necessary supplies, you can begin creating your beautiful crepe paper sunflower.

Step- by- step guide to make crepe paper sunflower

Now gather the ingredients and start doing it.

Step 1: Cutting petals of crepe paper sunflower

Cut a brown piece of crepe paper with a length of 23cm with widths of 1.7cm, 2.3cm and 3.3cm respectively. Then trimming sawtooth and roll each layer to the end.Do the same with the golden crepe paper size (3.6cm * 23cm) and paste in turn to create a complete pistil. Spread glue on the finished pistil on the finished paper sunflower base.

how-to-make-paper-sunflower-from-crepe-paper-diy-craft-tutorial-1

Step 2: Forming the petals of crepe paper sunflower

After cutting out the petals, it’s time to form them into a more realistic shape. To do this, take one petal and use a pencil to curl the edges upwards.

  • Repeat this process with all the petals until they are curled.
  • Then, fold the base of each petal slightly to create a crease.

Step 3: Assembling the petals of crepe paper sunflower

Once all the petals are formed, it’s time to assemble the crepe paper sunflower. 

  • Start by taking one petal and applying a small amount of glue to the base.
  • Then, attach it to the center of a piece of green floral wire.

how-to-make-paper-sunflower-from-crepe-paper-diy-craft-tutorial-2

Repeat this process with all the petals, spacing them out evenly around the center. Once all the petals are attached, wrap the wire with green floral tape to create the stem.

Adding the Center of crepe paper sunflower

Now that the petals are attached, it’s time to add the center of the crepe paper sunflower.

how-to-make-paper-sunflower-from-crepe-paper-diy-craft-tutorial-3

  • To do this, cut a small circle out of brown crepe paper.
  • Then, cut small slits around the edge of the circle to create a fringed effect.
  • Apply a small amount of glue to the center of the flower and attach the fringed circle.
  • Press down gently to secure it in place.

how-to-make-paper-sunflower-from-crepe-paper-diy-craft-tutorial-4

Paste the petals into the upper pistil, making sure to paste them in two alternating layers.

Step 5: Calyx of crepe paper sunflower

Cut green crepe paper sunflower with the size of 4cm * 13.5cm to make calyx shape. Paste and twist calyx into two different layers.

how-to-make-paper-sunflower-from-crepe-paper-diy-craft-tutorial-5

Connect the leaf to the stem with leaf tape and complete a realistic crepe paper sunflower to decor your home, your working corner or handmade gift maybe. So we will have a real handmade paper sunflower from crepe paper.

Tips for making wonderful crepe paper sunflower

Choosing the right petals for crepe paper sunflower

In order to make crepe paper sunflower is realistic, you should choose suitable color. If you want to have some creative flowers, you can choose different ones.

  • Choose petals that are yellow or orange in color
  • Make sure the petals are not wilted or damaged
  • Choose petals that are similar in size

Carefully cutting in each steps to make crepe paper sunflower

Cut out small green leaves from green crepe paper and attach them to the stem using floral tape

  • Use scissors to cut slits into the edges of the petals to create a fringed effect
  • Brush the edges of the petals with a darker shade of yellow to create depth and dimension 

Bringing creation on your crepe paper sunflower

  • To make your crepe paper sunflower look even more realistic, you can add some finishing touches
  • Create multiple sunflowers and arrange them together in a vase for a beautiful centerpiece
  • With these simple steps, you can easily create your own stunning crepe paper sunflower
  • Enjoy the process and let your creativity shine

Display the crepe paper sunflower

Once you’ve created your crepe paper sunflowers, there are endless ways to showcase them.

Crepe paper sunflower for decoration

  • Create a bouquet of crepe paper sunflower and display them in a vase or mason jar
  • Hang them on a wall using string or ribbon
  • Create a wreath using multiple sunflowers

Crepe paper sunflower for events

  • Use them as centerpieces for weddings or parties
  • Create a photo booth backdrop using multiple crepe paper sunflower
  • Give them as party favors or gifts

With these methods for making crepe paper sunflowers, you can create beautiful and unique decorations that will brighten up any space.

The following is a detail on how to make a paper sunflower step by step on youtube channel of Camellia Bees.

If you like my instructions, don’t forget to click like, share and subscribe to my channel.

SUBSCRIBE TODAY: https://www.youtube.com/c/camelliabees?sub_confirmation=1

FIND ME ON SOCIAL MEDIA:

Instagram: https://www.instagram.com/camelliabeeshandmade/

Facebook: https://www.facebook.com/camelliabeeshandmade/

Pinterest: https://www.pinterest.com/camelliabees/

CHECK OUT MY PAPER FLOWERS SHOP ON AMAZON: https://amzn.to/2XNHmNA

Some other easy handmade flower making guides you might like. Click on the link and see the instructions.

1. Handmade paper rose from crepe paper

2. DIY Poppy paper flowers from crepe paper

3. Lily paper flowers from crepe paper

Posted on Leave a comment

How to make paper rose bud with crepe paper

Today, Camellia Bees shows you how to make a paper rose bud from crepe paper. Follow my step by step tutorials to make them quickly. Let’s see how to make these easy paper rose bud.

Introduction to paper rose bud crafting

Crafting paper rose bud can be a fun and relaxing activity that anyone can enjoy. Whether you’re looking for a new hobby or want to create a unique gift for someone special, making paper rose buds is an excellent way to express your creativity. Not only are paper rose buds beautiful, but they also require minimal materials and can be made at home with ease. With just a few simple steps, you can make stunning paper rose buds that will last forever. In this article, we’ll guide you through the process of creating paper rose buds from start to finish.

Materials needed for making paper rose bud

Before getting started making paper rose bud, it’s important to gather all the necessary materials. Here’s what you’ll need:

  • Crepe paper: Green and Dark Scarlet
  • Tissue
  • Glue or Hot glue gun
  • Floral tape
  • Floral wire
  • Scissors and ruler

Once you have all your materials, it’s time to get started.

Step by step guide to creating paper rose bud

Creating a paper rose bud is a fun and easy craft project that anyone can do. With just a few materials and some simple steps, you can make a beautiful paper rose bud that will last forever. Follow these steps from Camellia Bees to create your own paper rose bud:

Step 1: Stigma of paper rose bud

diy-paper-rose-bud-how-to-make-crepe-paper-flower-easy-tutorial-1

Take a piece of tissue paper prepared to wrap in floral wire to create thickness for stigma of paper rose bud.

diy-paper-rose-bud-how-to-make-crepe-paper-flower-easy-tutorial-2

Then use floral tape to continue wrapping and form the stigma, complete with a pointed tip and bigger in the ovary.

Step 2: Petals of paper rose bud

diy-paper-rose-bud-how-to-make-crepe-paper-flower-easy-tutorial-3

First, prepare the template for petal to save time with detailed sizes: 2.5cm*5cm(1inch*2inch). Then just fold the dark scarlet crepe paper and cut the template.

Next, pasting the petals together to the stamen, a tip to make your buds soft and beautiful is to stroke the last petal before pasting.

diy-paper-rose-bud-how-to-make-crepe-paper-flower-easy-tutorial-4

Use a small piece of tissue paper wrapped around the foot of the paper rose bud and past with glue. Continue wrapping with floral tape to complete this step.

Step 3: Calyx and trunk of paper rose bud

diy-paper-rose-bud-how-to-make-crepe-paper-flower-easy-tutorial-5

Cut green crepe paper according to the size: 4cm * 6cm(11/2inch*21/4 inch) then cut the calyx like the picture above.

diy-paper-rose-bud-how-to-make-crepe-paper-flower-easy-tutorial-6

Finally, cover the calyx with glue to attach to the bud, then use green crepe paper to wrap the trunk. So, you’ve completed a beautiful paper rose bud.

Tips to making paper rose bud

Making paper flowers is a fun and creative activity that can be enjoyed by people of all ages and skill levels. Whether you prefer origami, crepe paper, or tissue paper, there’s a method that will suit your needs. To make perfect paper rose buds every time, follow these tips:

  • Choose high-quality materials that are easy to work with and will hold up over time
  • Practice patience and take your time when working on each individual petal and step
  • Experiment with different colors, textures, and shapes to create unique and beautiful rose buds
  • Don’t be afraid to make mistakes – learning from your failures is an important part of the creative process

Enjoy the process! Making paper rose buds should be a fun and relaxing activity that brings joy and beauty into your life.

Some ways to decorate with paper rose bud

While your paper rose bud is beautiful on its own, you can add some extra flair by decorating it further. Here are some tips to get you started with handmade flowers:

  • Add some sparkle
  • Add glitter or sequins to the petals for some extra sparkle
  • Get Creative with Colors and Textures
  • Use watercolors to paint the petals for a unique look
  • Experiment with different colors and textures of paper to create a variety of roses
  • Create a Bouquet
  • Attach multiple paper rose buds together to create a bouquet
  • Finish with Ribbon
  • Wrap ribbon around the stem for a finishing touch

Remember, the possibilities are endless when it comes to decorating your paper rose buds. Don’t be afraid to get creative!

To follow more details to step by step to make paper rose bud flower, please click and watch the video below. Hopefully, with the above easy instructions, you can complete a beautiful paper lotus flower to decorate or make a gift for your friends or relatives. Let’s try it !!!!

Some other easy handmade flower making guides you might like. Click on the link and see the instructions.

1. Paper Lily Flowers

2. Paper sunflower

3. Paper Chamomile daisy

Posted on Leave a comment

Step-by-step guide to crafting carnation paper flower

Making carnation paper flower is an easy and inexpensive way to add some color and cheer to your life. In this article, we will explore three different methods with their own unique style: single- layer, double- layer, and crepe paper.

How to make single layer carnation paper flower

The single layer carnation paper flower is a great technique for beginners as it requires only a few materials and is very simple to execute.

step-by-step-guide-to-crafting-carnation-paper-flowers-5

Materials to make single layer carnation paper flower

Creating a single layer carnation paper flower is a delightful and rewarding project that can add a touch of elegance to any occasion or home decor. To ensure a successful crafting experience, gather the following materials before you begin:

  • Colored tissue paper
  • Scissors
  • Floral wire
  • Green floral tape

Steps to make single layer carnation paper flower

If you’d like to create a bouquet of carnations paper flower, don’t forget to follow these steps:

  • Step 1: Cut a rectangular piece of colored tissue paper approximately 6 inches by 4 inches
  • Step 2: Fold the tissue paper accordion-style, making each fold about ½ inch wide
  • Step 3: Once you have folded the entire piece of tissue paper, tie a piece of floral wire around the center of the folded paper
  • Step 4: Cut both ends of the tissue paper into a rounded shape
  • Step 5: Carefully separate each layer of tissue paper, pulling them towards the center of the flower
  • Step 6: Use green floral tape to wrap around the base of the flower, covering the floral wire
  • Step 7: Twist the floral wire to form a stem

Your single layer carnation paper flower is now complete!

Tips for creating the perfect single layer carnation paper flower

The single layer carnation paper flower is a great way to add a pop of color to any room. It is also a great way to add a personal touch to a gift or event.  Additionally, this technique can be used to create a variety of different flowers, not just carnations.

  • When creating a single layer carnation paper flower, it is important to use high-quality tissue paper to ensure that the flower looks its best.
  • Additionally, it is important to be gentle when separating the layers of tissue paper to avoid tearing.
  • Finally, you can use a thin floral wire to ensure that the stem is not too bulky

How to make double layer carnation paper flower

The double layer carnation paper flower technique adds more dimension to the flower and is slightly more advanced than the single layer technique.

step-by-step-guide-to-crafting-carnation-paper-flowers-6

Materials to make double layer carnation paper flower

With just a few materials and some patience, you can craft a double layer carnation paper flower that will brighten up any space. Here’s a list of the essential supplies you’ll need to get started:

  • Colored tissue paper
  • Scissors
  • Floral wire
  • Green floral tape

Steps to make double layer carnation paper flower

Creating a beautiful double layer carnation paper flower is a fun and rewarding project. Let do it with Camellia Bees by some steps:

  • Step 1: Cut two rectangular pieces of colored tissue paper, one approximately 6 inches by 4 inches and the other approximately 5 inches by 3 inches
  • Step 2: Fold each piece of tissue paper accordion-style, making each fold about ½ inch wide
  • Step 3: Once you have folded both pieces of tissue paper, tie a piece of floral wire around the center of the larger folded paper
  • Step 4: Cut both ends of the larger tissue paper into a rounded shape
  • Step 5: Carefully separate each layer of tissue paper, pulling them towards the center of the flower
  • Step 6: Repeat steps 3-5 with the smaller piece of tissue paper
  • Step 7: Place the smaller flower on top of the larger flower, lining up the centers
  • Step 8: Use green floral tape to wrap around the base of the flowers, covering the floral wire
  • Step 9: Twist the floral wire to form a stem
  • Step 10: Your double layer carnation paper flower is now complete!

Tips to make perfect double layer carnation paper flower

Creating a stunning double layer carnation paper flower can be a delightful addition to your home décor, gift wrapping, or even as a beautiful accessory for a special event. To ensure your paper carnations turn out flawless, follow these helpful tips:

  • Choose the right paper: The type of paper you use can greatly impact the final result of your handmade paper flower. Opt for crepe paper or tissue paper, as they are lightweight and easy to work with, allowing you to create delicate and realistic petals.
  • Use a template: To achieve a consistent shape and size for your petals, use a template. You can find various petal templates online or create your own by drawing the desired shape on a piece of cardstock and cutting it out.
  • Layering is key: To create a full and lush double layer carnation, you’ll need to layer multiple petals. Start with a smaller layer of petals for the inner layer and gradually increase the size of the petals as you you move outward. This will give your flower a natural and voluminous appearance. Aim for at least two layers of petals, but feel free to add more for an even fuller look.
  • Color and texture: To make your carnation paper flower more visually appealing, consider using different shades of the same color for the layers or adding some texture to the petals. You can achieve this by gently crumpling the paper, using a pair of scissors to create fringes, or even adding some glitter or paint for a touch of sparkle.
  • Assemble with care: When attaching the petals to the flower’s base, use a hot glue gun or strong adhesive to ensure they stay in place. Be sure to overlap the petals slightly as you attach them, working in a circular pattern to create a natural-looking bloom.
  • Finishing touches: Once your double layer carnation paper flower is assembled, take a moment to fluff and shape the petals to your liking. You can also add a stem by attaching a piece of floral wire or a wooden skewer to the base of the flower. Finish off your creation by wrapping the stem with floral tape or ribbon for a polished look.

By following these tips, you’ll be well on your way to creating a stunning double layer carnation paper flower that is sure to impress.

How to make crepe paper carnation flower

The crepe paper carnation flower is a technique that uses crepe paper instead of tissue paper to create a more realistic-looking flower.
This method is perfect for those who want to add a touch of elegance to their crafts.

step-by-step-guide-to-crafting-carnation-paper-flowers-7

Materials to make crepe paper carnation flower

Before you begin make crepe paper carnation flower, make sure you have the following items on hand:

  • Colored crepe paper
  • Scissors
  • Floral wire
  • Green floral tape

Steps to make carnation paper flower with crepe paper

The carnation paper flower from crepe paper is perfect for those who want to add a touch of elegance to their crafts.

  • Step 1: The first step is to cut a rectangular piece of colored crepe paper approximately 12 inches by 4 inches

step-by-step-guide-to-crafting-carnation-paper-flowers-1

  • Step 2: Then, fold the crepe paper accordion-style, making each fold about ½ inch wide
  • Step 3: Once you have folded the entire piece of crepe paper, tie a piece of floral wire around the center of the folded paper

step-by-step-guide-to-crafting-carnation-paper-flowers-2

  • Step 4: Next, cut both ends of the crepe paper into a rounded shape
  • Step 5: Carefully separate each layer of crepe paper, pulling them towards the center of the flower
  • Step 6: Use green floral tape to wrap around the base of the flower, covering the floral wire

step-by-step-guide-to-crafting-carnation-paper-flowers-3

  • Step 7: Twist the floral wire to form a stem

step-by-step-guide-to-crafting-carnation-paper-flowers-4

Your crepe paper carnation flower is now complete! The crepe paper carnation flower is a great alternative to tissue paper flowers.

Tips to make perfect carnation paper flower from crepe paper

Making carnation paper flowers is an easy and enjoyable craft that anyone can do.
Here are some tips to help you create perfect carnation paper flowers:

  • Be gentle when separating the layers of tissue paper or crepe paper to avoid tearing
  • Experiment with different colors and combinations to create unique flowers
  • Use sharp scissors to cut clean edges on the paper
  • Don’t be afraid to try new techniques and methods to find what works best for you

Hope that handmade tutorial videos from Camellia Bees helps you make paper carnation flowers easily.

In conclusion, making carnation paper flowers is a fun and creative way to add some color and cheer to your life. With these three methods, you’ll be able to make stunning flowers that will impress everyone who sees them. So go ahead, grab some paper and give it a try!

If you don’t have time do it by yourself, discovery handmade flower collection to choose the most suitable flowers.

Posted on Leave a comment

How to make Rainbow Rose from crepe paper

Camellia Bees will show you how to make the crepe paper Rainbow rose flower. Follow my step by step tutorials to make them quickly. Let’s see how to make these easy crepe paper . So easy paper DIY for all of you.

Materials for making Rainbow Rose from crepe paper

Making a Rainbow Rose from crepe paper is an easy and fun craft that anyone can do. Before beginning, it’s important to gather all the necessary supplies. Here are the items needed:

  • Scissors
  • Tissue
  • Floral Tape
  • Tacky Glue or Hot Glue gun
  • Floral Wires
  • Crepe paper: Green and 8 your favorite colors to make rainbow rose flower

These materials can be found at any craft store or online.

Step by step guide for making Rainbow Rose from crepe paper

Once you have everything, it’s time to start creating your beautiful Rainbow Rose. Screw it, let do it!

Step 1: Make templates for petals of crepe paper rainbow rose art craft.

how-to-make-rainbow-rose-crepe-paper-flower-diy-super-easy-way-tutorial-1

To save time, you fold the paper and cut the petals to a specific pattern and size:

1 1/2 inch*3 inch

Step 2: Connect the petals to form a beautiful rainbow rose flower

how-to-make-rainbow-rose-crepe-paper-flower-diy-super-easy-way-tutorial-2

Wrap tissue into the trunk then wrap with floral tape to form a bud. At the first petals on the bud, you stick the petals to hold the bud tightly.

how-to-make-rainbow-rose-crepe-paper-flower-diy-super-easy-way-tutorial-3
After the first petal, you will paste the next petal normally with the opening at the top. Remember to trick the petals so they become softer.

Your flower is not finished yet, but you need to use floral tape to wrap it in the calyx position.

how-to-make-rainbow-rose-crepe-paper-flower-diy-super-easy-way-tutorial-4

Cut a little at the base of the petal then paste them in a funnel shape to create a flurry of outermost petals.

Step 3: Calyx and leave of rainbow rose flower

how-to-make-rainbow-rose-crepe-paper-flower-diy-super-easy-way-tutorial-5

Similar to other posts, cut the calyx and gently stroke it.

Similar to other posts, cut the calyx and gently stroke it. Use crepe green paper to wrap sepals to the end of the flower.

how-to-make-rainbow-rose-crepe-paper-flower-diy-super-easy-way-tutorial-6

Cut the leaf pattern as shown above, then fold gently along the middle of the leaf and apply floral wire to finish.

To follow more details to step by step to make paper Rainbow Rose flower. Please click and watch the video below from Camellia Bees. Hopefully, with the above easy instructions, you can complete a beautiful paper flower to decorate or make a gift for your friends or relatives. Let’s try it !!!!

3. Display Rainbow Rose

Congratulations! You’ve now made a beautiful Rainbow Rose from crepe paper. To display it, place it in a vase or tie a ribbon around the stem and hang it up. If you want to preserve your rose, there are a few things you can do.

  • First, spray it with hairspray to help prevent the colors from fading.
  • Second, store it in a cool, dry place away from direct sunlight.
  • Finally, consider placing it in a shadow box or frame to protect it from damage.

In conclusion, making a Rainbow Rose from crepe paper is a fun and easy craft that anyone can enjoy. With just a few supplies and some creativity, you can create a beautiful and unique decoration for your home or office. So go ahead and give it a try – you won’t be disappointed!

If you like my instructions, don’t forget to click like, share and subscribe to my channel.

SUBSCRIBE TODAY: https://www.youtube.com/c/camelliabees?sub_confirmation=1

FIND ME ON SOCIAL MEDIA:

Instagram: https://www.instagram.com/camelliabeeshandmade/

Facebook: https://www.facebook.com/camelliabeeshandmade/

Pinterest: https://www.pinterest.com/camelliabees/

CHECK OUT MY PAPER FLOWERS SHOP ON AMAZON:

https://amzn.to/2XNHmNA

Some other easy handmade flower making guides you might like. Click on the link and see the instructions.

1. Paper Lotus Flower

2. Carnation Paper Flower

3. Paper Lily Flowers

Posted on Leave a comment

How to make Eyeball paper flowers for Halloween

Camellia Bees will show you how to make Eyeball paper flowers. Let’s see how to make these easy Eyeball paper flowers for Halloween decoration. So easy paper DIY for all of you. Step by step tutorial for crepe paper flower making.

Materials for making Eyeball paper flowers for Halloween

To create Eyeball paper flowers for Halloween, you will need the following materials:

  • Scissors
  • Floral Tape (Green or Light Green)
  • Tacky Glue or Hot Glue gun
  • Floral Wires
  • Black crepe paper
  • Water color

These materials can easily be found at your local craft store or online. Once you have gathered all necessary items, it’s time to get started on making your spooky decorations! Now, let’s DIY eyeball paper flowers with Camellia Bees!

Step by step guide to make Eyeball paper flowers

Creating paper flowers is a fun and easy craft that can be enjoyed by people of all ages. Follow these simple instructions to make your own eyeball paper flowers.

Step 01: Eye of Eyeball paper flowers for Halloween

how-to-make-eyeball-paper-flowers-for-halloween-decoration-from-crepe-paper-1

Cut a piece of plastic with a diameter of 2 cm by the diameter of the petal, then paste it on the prepared sponge bud. Then cut a small piece of black crepe paper to make the eyeballs of the paper flower.

Step 02: Pistil of Eyeball paper flowers for Halloween

how-to-make-eyeball-paper-flowers-for-halloween-decoration-from-crepe-paper-2

Cut crepe paper size 5.5 cm * 25 cm, fold in 4 and then cut into fibers to make pistil. Use your fingers to gently twist the pistil of eyeball paper flowers.

Use glue gun to glue the finished fringe into the completed eyeball.

Step 03: Petals of eyeball paper flowers for Halloween

There are 3 types of petals in the design of this eyeball flower design. Please pay attention, they will be the same size 4 cm * 5 cm but cut into 3 shapes below:

  • Heart-shaped petals
  • Oval petals
  • 3-petal petals

how-to-make-eyeball-paper-flowers-for-halloween-decoration-from-crepe-paper-3

Gentle drag to shape the petals, then paste them into the trunk. Flower layer in heart shape, 3 pyramid shape inside, flower layer in oval shape outside.

Step 04: Calyx of Eyeball paper flower for Halloween

how-to-make-eyeball-paper-flowers-for-halloween-decoration-from-crepe-paper-4

This part is very familiar to you guys. You only need to fold a piece of crepe paper into 4 and cut in the picture below.

Lastly, just paste the sepals onto the newly completed petal to finish a tasteful decoration for this Halloween season.

To follow more details to step by step making Eyeball paper flower for Halloween, please click and watch the video below. Hopefully, with the above easy instructions, you can complete a beautiful paper flower to decorate on Hallowen season. Let’s try it !!!!

Tips for perfect Eyeball paper flowers for Halloween

These flowers can be used as decorations for Halloween parties or as a fun craft activity for kids. Therefore, if this is the first time you make it, don’t worry. Camellia Bees give you some tips:

  • Creating Realistic Eyes: To create a more realistic eye, use different shades of red tissue paper for the veins.
  • Experimenting with Sizes and Shapes: Experiment with different sizes and shapes of white tissue paper to create unique flowers. By using different sizes and shapes of tissue paper, you can create a variety of flowers that look like they came from different types of eyes.
  • Using a Hot Glue Gun: Use a hot glue gun instead of a glue stick for a stronger hold. A hot glue gun will ensure that your flowers stay together and don’t fall apart.
  • Adding Extra Spooky Touches: Spray your finished eyeball paper flowers with glitter or glow-in-the-dark spray paint for an extra spooky touch. Adding glitter or glow-in-the-dark spray paint will make your flowers stand out and add an extra spooky touch to your decorations.

If you like my instructions, don’t forget to click like, share and subscribe to my channel.

SUBSCRIBE TODAY: https://www.youtube.com/c/camelliabees?sub_confirmation=1

FIND ME ON SOCIAL MEDIA:

Instagram: https://www.instagram.com/camelliabeeshandmade/

Facebook: https://www.facebook.com/camelliabeeshandmade/

Pinterest: https://www.pinterest.com/camelliabees/

CHECK OUT MY PAPER FLOWERS SHOP ON AMAZON:

https://amzn.to/2XNHmNA

Some other easy handmade flower making guides you might like. Click on the link and see the instructions.

Pinterest: https://www.pinterest.com/camelliabees/

CHECK OUT MY PAPER FLOWERS SHOP ON AMAZON:

https://amzn.to/2XNHmNA

Some other easy handmade flower making guides you might like. Click on the link and see the instructions.

1. Paper Myosotis scorpioides Flower

2. Paper Marigold Flower

3. Paper Dahlia Flower

Posted on Leave a comment

How to make paper Bluebell flowers from crepe paper

Camellia Bees will show you how to make paper Bluebell Flower. So easy paper DIY for all of you. Step by step tutorial for crepe paper flower making – do it yourself. Follow my step by step tutorials to make them quickly. 

Materials to make paper Bluebell flowers from crepe paper

Before starting the bluebell flower project with Camellia Bees, gather the following supplies:

  • Scissors
  • Floral Tape (Green or Light Green)
  • Tacky Glue or Hot Glue gun
  • Floral Wires
  • Crepe paper
  • Coton Ball

Additional tools like a hot glue gun, wire cutters, and a ruler may be helpful, but not necessary to create beautiful flowers.

Step by step guide for making paper Bluebell flowers from crepe paper

Now, let’s DIY paper Bluebell Flowers with me!

First, I will show you how to make petals of Bluebell flower

diy-paper-bluebell-flower-from-crepe-paper-how-to-make-easy-and-realistic-1

Cut sample paper to size 3cmx2.5cm. Each template is every flower.
Cut paper in a jagged shape and use scissors to create curvature for the petals.

diy-paper-bluebell-flower-from-crepe-paper-how-to-make-easy-and-realistic-2

Cover the paper with glue but do not fill it, just glue it on the edge of the paper. Then paste the coton ball has the floral wire and the petals together.Use purple crepe paper to wrap the flowers

diy-paper-bluebell-flower-from-crepe-paper-how-to-make-easy-and-realistic-3

The Bluebell flower has a rather special small sepia, which resembles a characteristic purple colored leaf.

You only need to cut a small piece of paper with a slim shape and paste it into the flower body and it’s done, it’s easy to do.

Next is to combine the small flowers to form a bunch of beautiful paper Bluebell flowers

diy-paper-bluebell-flower-from-crepe-paper-how-to-make-easy-and-realistic-4

Wrap the flowers with light blue floral tape.
Bluebell flowers are very easy to make, suitable for beginners who love paper flowers.

Finally, the leaves of the paper Bluebell flowers

diy-paper-bluebell-flower-from-crepe-paper-how-to-make-easy-and-realistic-5

The leaves of the paper Blubell flowers are also easy to do, just cut the blue crepe paper like the picture and paste it into the trunk with hot glue gun.

To follow more details to step by step making paper Bluebell flowers, please click and watch the video below. Hopefully, with the above easy instructions, you can complete a beautiful paper flower to decorate or make a gift for your friends or relatives. Let’s try it !!!!

Tips for making paper Bluebell flowers

Creating paper flowers from crepe paper is a simple process, but there are a few tips and tricks that can be used to make the flowers look even more realistic.

  • Choosing the right colors: Choosing shades of blue and green that closely match the colors of real bluebells and their leaves can make a significant difference in the realism of the flowers.
  • Varying shapes and sizes: When cutting out petals and leaves, varying the shapes and sizes can mimic the natural variations found in real flowers, making them appear more organic and lifelike.
  • Adding depth and dimension: Shading the edges of the petals with darker hues of blue can add depth and dimension to the flowers, making them appear more three-dimensional.

Ways to display paper Bluebell flowers

Now that you’ve created your beautiful paper Bluebell flowers, it’s time to display them! Here are a few creative ways to showcase your handmade flowers:

  • Arrange several flowers in a vase or mason jar for a simple yet elegant centerpiece
  • Create a wreath using your bluebells and some additional greenery.
  • Hang it on your front door or above your fireplace for a charming touch of springtime.
  • Attach individual flowers to hair clips or bobby pins for a fun and whimsical accessory
  • Use your bluebells to decorate gift packages or greeting cards for an extra special touch
  • Scatter a few flowers around your home, tucking them into bookshelves, windowsills, or other nooks and crannies

Whether you’re looking for a fun crafting project to do with friends or simply want to add some color and life to your home décor, making bluebells from crepe paper is a wonderful way to let your creativity shine.

If you like my instructions, don’t forget to click like, share and subscribe to my channel.

SUBSCRIBE TODAY: https://www.youtube.com/c/camelliabees?sub_confirmation=1

FIND ME ON SOCIAL MEDIA:

Instagram: https://www.instagram.com/camelliabeeshandmade/

Facebook: https://www.facebook.com/camelliabeeshandmade/

Pinterest: https://www.pinterest.com/camelliabees/

CHECK OUT MY PAPER FLOWERS SHOP ON AMAZON:

https://amzn.to/2XNHmNA

Some other easy handmade flower making guides you might like. Click on the link and see the instructions.


1. Paper Lisianthus

2. Paper Rose Bud

3. Paper Calla Lily

Posted on Leave a comment

How to make paper Artichoke flowers from crepe paper

Today, Camellia Bees will show you how to make paper Artichoke flowers. Follow my step by step tutorials to finish them quickly. Let’s see how to make these easy paper Artichoke flowers.

Materials for making paper Artichoke flowers from crepe paper

To create beautiful paper Artichoke flowers, you will need the following materials:

  • Scissors
  • Floral Tape (Green or Light Green)
  • Tacky Glue or Hot Glue gun
  • Floral Wires
  • Crepe paper
  • Tissue paper
  • Color pen

Step by step guide for making paper Artichoke flowers from crepe paper

Creating paper Artichoke flowers is an easy and enjoyable craft activity that anyone can do. Follow these simple steps to make your own stunning paper artichoke flowers from crepe paper. Now, let’s DIY paper Artichoke flowers with Camellia Bees!

 Step 01: Stem and flower base of paper Artichoke flowers

how-to-make-paper-artichoke-flowers-from-crepe-paper-diy-tutorial-1

Take a 6-inch A4-sized paper and wrap it into a cylinder.

Then grab a tissue paper wrapped in several layers of circles on the top of the trunk. Continue to use tightly wrapped yellow floral tape to fix the base of paper Artichoke flowers as shown.

Step 02: Pistil and petals of paper Artichoke flowers

how-to-make-paper-artichoke-flowers-from-crepe-paper-diy-tutorial-2

Prepare 8 pieces of purple crepe paper with size 3 cm * 25 cm. Continue trimming them into a filament.

how-to-make-paper-artichoke-flowers-from-crepe-paper-diy-tutorial-3

Use a glue gun to roll these 4 layers of paper together to make flower buds, then glue onto the finished flower base.

Continue wrapping 4 more layers of crepe paper until the end of the paper Artichoke flowers. Use scissors to trim the excess petals.

Step 03: Leaves of paper Artichoke flowers

how-to-make-paper-artichoke-flowers-from-crepe-paper-diy-tutorial-4

Cut about 50-60 pieces of paper-shaped crepe paper with the size of 2.5 * 3.5 cm. Use a small yellow pen to lightly stroke the edge of the leaf. Then paste them into layers alternately on the sepals to help the artichoke flower look the most realistic.

how-to-make-paper-artichoke-flowers-from-crepe-paper-diy-tutorial-5

To follow more details to step by step making paper Artichoke flowers, please click and watch the video below. Hopefully, with the above easy instructions, you can complete a beautiful paper flower to decorate your room. Let’s try it !!!!

Tips for making perfect paper Artichoke flowers

When making paper Artichoke flowers, it’s important to keep a few tips and tricks in mind to ensure that your flowers turn out beautifully.

Choosing the right paper to make paper Artichoke flowers

One of the most important factors in creating realistic and sturdy paper artichoke flowers is using high-quality crepe paper. This will ensure that your handmade flowers hold their shape well and look as realistic as possible.

Size matters to make paper Artichoke flowers

If you want to create a larger flower, it’s important to use a larger Styrofoam ball and more crepe paper strips. This will help your flower look more proportional and full.

Get creative with colors to make paper Artichoke flowers

Don’t be afraid to experiment with different colors of crepe paper to create unique and colorful paper Artichoke flowers. This is a great way to add a personal touch to your paper artichokes. Vary the length and width of the fringed strips when wrapping them around the Styrofoam ball to give your flowers a more natural look.

Keep glue to a minimum to make paper Artichoke flowers

When using a glue gun to assemble your paper Artichoke flowers, it’s important to use it sparingly to avoid any unsightly glue marks on your finished flowers.

A little bit of glue goes a long way!

If you like my instructions, don’t forget to click like, share and subscribe to my channel.

SUBSCRIBE TODAY: https://www.youtube.com/c/camelliabees?sub_confirmation=1

FIND ME ON SOCIAL MEDIA:

Instagram: https://www.instagram.com/camelliabeeshandmade/

Facebook: https://www.facebook.com/camelliabeeshandmade/

Pinterest: https://www.pinterest.com/camelliabees/

CHECK OUT MY PAPER FLOWERS SHOP ON AMAZON:

https://amzn.to/2XNHmNA

Some other easy handmade flower making guides you might like. Click on the link and see the instructions.

Pinterest: https://www.pinterest.com/camelliabees/

CHECK OUT MY PAPER FLOWERS SHOP ON AMAZON:

https://amzn.to/2XNHmNA

Some other easy handmade flower making guides you might like. Click on the link and see the instructions.

1. Paper Myosotis scorpioides Flower

2. Paper Marigold Flower

3. Paper Dahlia Flower

Posted on Leave a comment

How To Make Paper Ranunculus Flower From Crepe Paper

Today, Camellia Bees shows you how to make a paper Ranunculus flower small size from crepe paper. It looks complicated but you only need to follow my step-by-step guide to make the most beautiful paper Ranunculus flower. So easy paper DIY for all of you.

Materials to make paper Ranunculus flowers from crepe paper

Before starting the process of making paper Ranunculus flower, you just need to prepare the simple materials as below:

  • Crepe paper
  • Coton Ball
  • Glue or Hot glue gun
  • Floral tape
  • Scissors
  • Ruler

Step by step guide to make paper Ranunculus flowers

Creating paper Ranunculus flowers is a fun and easy craft project that can be done with just a few materials. Follow these simple steps to make your own beautiful paper flowers.

Step 1: Preparing template of paper Ranunculus flowers

First, prepare the template for each type of petal to save time with detailed sizes of each type sbelow. Then just fold the blue crepe paper and cut the template to be:

  • 16 Center petals: 2cm x 1cm
  • 16 Outer petals: 2cm x 1.5cm
  • 20 Full petals: 2.2cm x 2cm

how-to-make-paper-ranunculus-flower-from-crepe-paper-ii-small-size-diy-1

Besides, you need to cut a round piece of paper with darker tones to paste on cotton ball.

how-to-make-paper-ranunculus-flower-from-crepe-paper-ii-small-size-diy-7

In the center layer, you use the smallest petals stuck to each other onto the coton ball clockwise. In this first layer of flowers, paste the entire petal.

Step 2: Making template of paper Ranunculus flower

In the second layer of flowers, continue to paste the same as the first layer of flowers, but only partially glue the petals and continue to paste.

Continue to do the same with the last floral layer. In the outermost petals you use your arms to stretch to create the inflection of the petals.

Use a brush to paint the top of the petals to create the characteristic of Ranunculus flower.

Step 3: Calyx of paper Ranunculus flower

Fold the green crepe paper to cut the sepals with the tip to make the sepals. Then paste with hot glue gun that you have completed the beauty Paper Ranunculus flower.

To follow more details to step by step to make paper Ranunculus flower please click and watch the video below. Hopefully, with the above easy instructions, you can complete a beautiful paper flower to decorate or make a gift for your friends or relatives. Let’s try it !!!!

Tips and Tricks for Making Perfect Paper Ranunculus Flower

Making paper ranunculus flowers can be a bit tricky at first, but with some practice, you’ll soon become an expert. Here are some tips and tricks to help you create perfect paper ranunculus flowers:

Use different shades of crepe paper to make paper Ranunculus flowers

Using different shades of crepe paper can create a more realistic effect for your paper ranunculus flowers. This can add depth and dimension to your flowers, making them look more like the real thing.

Stretch the petals lengthwise before make paper Ranunculus flowers

Stretching the petals lengthwise can give them a more natural curve, making them look more like real ranunculus flowers.

  • This can be done by gently pulling the edges of the petals in opposite directions.
  • Stretching the petals lengthwise can give them a more natural curve.

Be patient when attaching petals to create paper Ranunculus flowers

When attaching the petals to the center of the flower, take your time to ensure they are positioned correctly. This can be a delicate process, but it’s important to be patient to achieve the desired effect.

Experiment with different sizes and shapes of p etals when you make paper Ranunculus flowers

Experimenting with different sizes and shapes of petals can create unique-looking flowers.

  • This can add variety to your paper ranunculus bouquet and make it more interesting to look at.
  • Experimenting with different sizes and shapes of petals can create unique-looking flowers.

Use a ruler to ensure consistency between paper Ranunculus flowers

Using a ruler to ensure that all your petals are the same size can help create a more uniform and professional-looking paper ranunculus flower. This can be especially helpful if you’re making multiple flowers for a bouquet.

Have Fun and Be Creative. Most importantly, have fun and be creative! Making paper ranunculus flowers can be a relaxing and enjoyable activity, so don’t be afraid to experiment and try new things.

Posted on Leave a comment

How to make paper Gladiolus flowers from crepe paper

Today, Camellia Bees will show you how to make paper Gladiolus flowers. Follow my step by step tutorials to finish them quickly. Let’s see how to make these easy paper Gladiolus flowers. So easy paper DIY for all of you. Step by step tutorial for crepe paper flower making – do it yourself.

Materials and tools to make paper Gladiolus flowers from crepe paper

These paper flowers are made from crepe paper which is lightweight and easy to work with. The best part about making these paper Gladiolus flowers is that they require minimal materials and can be made in the comfort of your own home. So, what you will need:

  • Scissors
  • Floral Tape (Yellow)
  • Tacky Glue or Hot Glue gun
  • Floral Wires
  • Crepe paper
  • Tissue paper
  • Color crayon

Steps to make paper Gladiolus flowers from crepe paper

Like any craft, creating crepe paper flowers takes practice. Don’t be discouraged if your first few attempts aren’t perfect. Keep practicing and experimenting until you find the techniques that work best for you.

Now, let’s DIY paper Gladiolus flowers with Camellia Bees!

Step 01: Stem of paper Gladiolus flowers

how-to-make-paper-gladiolus-flowers-from-crepe-paper-diy-tutorial

Wrap the yellow tape into a piece of wire about 50cm long to make the stem of the Gladiolus flower. Then use wire to wrap along the trunk to create thickness and stiffness for the trunk.

Step 02: Leaves of paper Gladiolus flowers

how-to-make-paper-gladiolus-flowers-from-crepe-paper-diy-tutorial-2

Cut green crepe paper with 2 sizes below:

  • 13 cm * 5 cm: 4 pieces of small leaf
  • 17 cm * 5 cm: 4 pieces of big leaf

Then fold the piece of paper in half and bevel one end of the leaf to make the shape shown below. Use a yellow crayon to paint the edge of the leaf to make it more realistic.

how-to-make-paper-gladiolus-flowers-from-crepe-paper-diy-tutorial-3

After that, attach the stem to the center of the leaf and fold it in half. Continue to do the same for the next 2 layers of paper Gladiolus flower.

Step 03: Flower of paper Gladious flowers

Cut 5cm * 6 cm pink crepe paper to make petals. Here we will have 2 types of small and large flowers in different ways. You just need to follow the step by step guide of camelliabee.com.

  • Small paper Gladiolus flowers :

how-to-make-paper-gladiolus-flowers-from-crepe-paper-diy-tutorial-4

You fold the crepe paper in half, then cut the top of the paper in a heart shape. Then open and twist the pattern to form petals. Do the same with the other piece of paper, then glue the two petals together. Finally, paste directly into the interstitial part of the leaf of paper Gladiolus flower.

  • Big paper Gladiolus flowers

how-to-make-paper-gladiolus-flowers-from-crepe-paper-diy-tutorial-5

You cut 6 samples of pink crepe paper with the same size as above, then cut the piece of paper in half into two triangles and then attach two long edges to the wire. Then use scissors to shape the petals. How to do paper Gladiolus flower the same as making orchid you can refer here.

how-to-make-paper-gladiolus-flowers-from-crepe-paper-diy-tutorial-6

Use yellow tape to wrap the petals together, then stick them directly onto the body. Continue to paste leaves and flowers alternating to create a complete paper Gladiolus flower.

Benefits of making paper Gladiolus flowers with crepe paper

Making paper gladiolus flowers has many benefits, including:

Making paper Gladiolus flowers from crepe paper is cost-effective and customizable

One of the best benefits of making paper Gladiolus flower is chepaer than available paper flower:

  • Cost-effective: Real flowers can be expensive, especially if you need a large quantity. Making your own paper flowers is a much more affordable option.
  • Customizable: With paper flowers, you can choose the colors and sizes that best fit your needs. You can even mix and match different types of flowers for a unique look.

Making paper Gladiolus flowers from crepe paper is durable and sustainable

Making paper flowers is a great way to save money while still having beautiful decorations for any occasion.

  • Durable: Paper flowers are much more durable than real flowers.
    They won’t wilt or die and can be used over and over again.
  • Sustainable: Making paper flowers is an eco-friendly alternative to buying real flowers which often have a large carbon footprint due to transportation and production methods.

Making paper Gladiolus flowers from crepe paper is easy and versatile

Making paper gladiolus flowers from crepe paper is a fun and easy DIY project that anyone can do.

  • Easy to Make: Making paper flowers is a simple and fun craft that anyone can do with a little practice.
  • Versatile: Paper flowers can be used for a variety of purposes, such as home decor, wedding decorations, and even as a gift.

Paper flowers are perfect for those who want to add a personal touch to their decorations.

With just a few materials and some patience, you can create beautiful and realistic-looking flowers that will last for years to come. Whether you’re looking to decorate your home or add a personal touch to a special occasion, paper flowers are a great choice.

So why not give it a try?

To follow more details to step by step making paper Gladiolus flower, please click and watch the video below. Hopefully, with the above easy instructions, you can complete a beautiful paper flower to decorate your room. Let’s try it !!!!


Posted on Leave a comment

How to make Dahlia paper flower

Making paper flowers is a fun and creative way to decorate your home or add a unique touch to gifts. One of the most beautiful and popular paper flowers is the dahlia. With its vibrant colors and intricate petals, it’s no wonder why so many people love making them. In this article, I’ll be sharing my personal experience on how to make a stunning Dahlia paper flower.

1. Materials and Tools Needed for Dahlia paper flower

1.1. Materials

You can find these supplies at any craft store or online retailer. Make sure to choose tissue paper in your desired color scheme, as well as floral wire that is sturdy enough to hold the weight of the flower:

  • Colored tissue paper (at least 8 sheets)
  • Floral wire
  • Green floral tape
  • Scissors

1.2. Tools

Same as making Calla Lily, with Dahlia paper flower, there are some necessary tools, including:

  • Ruler
  • Pencil

2. Step by step guide on making a Dahlia paper flower

As someone who loves crafting, making paper flowers has always been one of my favorite activities. Today, Camellia Bees share with you a step-by-step guide on how to make a beautiful dahlia paper flower. Easy way to make a realistic Dahlia paper flower. DIY step by step tutorial Dahlia paper flower making. Take it easy to make!
Let’s see how to make these easy crepe Dahlia paper flowers with specific image and tutorial handmade videos below.

2.1. Step 01: Template of Dahlia paper flower

how-to-make-dahlia-paper-flower-diy-tutorial-step-by-step-1

how-to-make-dahlia-paper-flower-diy-tutorial-step-by-step-2

First create the petal template, detailed leaves as shown above, then you just cut to those dimensions to save time.

2.2. Step 02: Petals of Dahlia paper flower

how-to-make-dahlia-paper-flower-diy-tutorial-step-by-step-3

Cut a light pink crepe paper in the size of 1 inch * 2 1/4 inch to create petal shape and paste it into the foam pistil of Dahlia paper flower.

how-to-make-dahlia-paper-flower-diy-tutorial-step-by-step-4

Do the same with the 2nd layer.

Next is to create the petals with the following dimensions:

  • 1/2 inch * 1 1/4 inch
  • 1/2 inch * 1 1/2 inch
  • 3/4 inch * 2 inch
  • 1inch * 2 1/2 inch
  • 1 inch * 3 inches

how-to-make-dahlia-paper-flower-diy-tutorial-step-by-step-5

Pasting each petal of Dahlia paper flower in turn, the small size of the inner layer, the large size of the outer layer.

how-to-make-dahlia-paper-flower-diy-tutorial-step-by-step-6

Cut green crepe paper with size 3cm * 6cm to make sepals then apply glue to the finished main flower.

2.3. Step 3: Shape petals of Dahlia paper flower.

Using your fingers, carefully shape each petal to give it a more natural look.
You can also use scissors to trim any uneven edges.

2.4. Step 4: Attach stem of the Dahlia paper flower.

Finally, take your green floral tape and wrap it around the base of the flower, covering the wire stem completely. Continue wrapping the tape down the length of the stem until you reach the end.
Congratulations!
You’ve just made a beautiful Dahlia paper flower. This is a fun and easy craft that you can do with your friends and family. Try making different colors and sizes to create a stunning bouquet.

To follow more details to step by step to make Dahlia paper flower. Please click and watch the video below. Hopefully, with the above easy instructions, you can complete a beautiful paper flower to decorate or make a gift for your friends or relatives. Let’s try it !!!!

3. Creative ways to use your Dahlia paper flower

Now that you know how to make a Dahlia paper flower, let’s explore some creative ways to use them:

  • Create a bouquet of dahlia paper flowers to brighten up any room in your home
  • Add a single flower to a wrapped gift for a unique touch
  • Use multiple flowers to decorate a party or wedding venue
  • Glue a flower onto a hair clip or headband for a fun accessory
  • Make a wreath out of dahlia paper flowers to hang on your front door
  • The possibilities are endless when it comes to using dahlia paper flowers. Get creative and have fun with it!

In conclusion, making a Dahlia paper flower is a simple yet rewarding craft that anyone can do. With just a few supplies and some patience, you can create handmade flowers that will brighten up any space. Remember to experiment with different colors and shapes to make your flowers truly unique.
Happy crafting!


Posted on Leave a comment

The reasons why paper handmade flower are popular

Paper handmade flower is popular and familiar for many people in modern world. It is used for many different purposes from decoration, relax, to gift. Today, Camellia Bees gives more information about paper handmade flower. 

Meaning of paper handmade flower

The same as real flowers, paper handmade flower has many different meaning. It depends on factors, including color, material and occasion.

Meaning of paper handmade flower based on colors

Paper handmade flowers can be made in any color. With real flowers, you’re limited to the colors that nature provides. With paper handmade flowers, however, you can choose any color under the sun! Whether you want bright and bold hues or soft pastels, it’s easy to create a custom color scheme that matches your style. The same as fresh flowers, paper handmade flower has also color with different meaning:

  • Red paper handmade flower: Red roses symbolize all the things that make up a great love story: Passion, longing, true love and romance. No wonder the red rose has become a classic Valentine’s Day flower! In bridal bouquets or other wedding arrangements, red roses can symbolize newlywed happiness and mutual respect and affection between the couple.
  • Pink paper handmade flower: These flowers are a symbol of elegance, sophistication, sweetness and femininity. Pink roses are suitable for royalty. Furthermore, pale pink roses are often associated with grace, tenderness, cheerfulness, and happiness.
  • White paper handmade flower: White roses represent purity, youth and innocence. Young love, eternal loyalty, and new beginnings are also often associated with the meaning of white roses, making them a popular choice for weddings and romantic occasions.
  • Yellow paper handmade flower: Yellow is the color of bright sunshine, warmth, joy, and joy. The meaning of yellow roses in love is as special as its color. These are the best wishes for your loved ones. For Westerners, the yellow rose is a symbol of power, wisdom and bright happiness.
  • Purple paper handmade flower: While the purple fresh flower is quite rare, purple rose which is made by hand is not hard to buy. In love, purple represents fidelity, iron, and eternity, so purple roses symbolize a bonded relationship that is sustainable over time. Previously, purple roses were also chosen to offer to kings. Therefore, they remind us of nostalgia, an extraordinary nobility.

the-reasons-why-paper-handmade-flower-are-popular-1

Meaning of paper handmade flower based on custom occasions

Paper handmade flower can be customized for any occasion, from weddings to birthdays to anniversaries. You can even create custom bouquets that incorporate specific themes or motifs, making them truly one-of-a-kind.

  • In the wedding anniversary: Celebrating the wedding day, choosing meaningful handmade flowers through beautiful bouquets and flower baskets, such as scarlet roses, sweet carnations, sunflowers,…. However, each year of the wedding anniversary shows a different meaning and is represented by a specific flower. Therefore, based on each person, you should choose a suitable handmade flower.
  • On birthdays: On birthdays, handmade flowers are not only congratulations, but also a special gift for relationships and friends. There are a lot of types of handmade flowers which are made from wood, wool, linen,… A handmade flower bouquet with paper is one of the most popular products because it is suitable for anyone.
  • On valentine’s day: This is a special day for couples to show their love to their partner, so a handmade paper flower bouquet craft is a gift instead of any words. On Valentine’s day, a paper rose represents burning and deep love. On the other hand, if your partner has passion for other flowers, don’t forget to prioritize his/ her preference.

It can be said that paper handmade flowers are popular for both men and women on any special occasions.

Meaning of paper handmade flower based on combined materials

Paper handmade flower can be combined with other materials such as ribbon, lace, or beads to create unique and eye-catching designs. By mixing and matching different textures and materials, you can create a bouquet that’s both beautiful and interesting. Overall, paper handmade flowers offer endless customization options that allow you to create a truly unique and personalized bouquet. Whether you’re looking for a specific color scheme, theme, or message, paper handmade flowers can be tailored to your preferences and needs.

Advantages of paper handmade flower

Many people choose paper handmade flower than fresh flower because its appearance as well as other benefits:

Paper handmade flower is friendly- environment

the-reasons-why-paper-handmade-flower-are-popular-2

One of the most advantage from paper handmade flower is friendly- environment which contributes to protect environment.

  • They’re made from recycled materials: Paper handmade flowers are often crafted from recycled materials such as old newspapers, magazines, and cardboard boxes. This means that they’re not only beautiful but also sustainable. By using recycled materials, you’re reducing waste and helping the environment.
  • They’re biodegradable: When you’re done with your paper handmade flowers, you can simply throw them away without worrying about harming the environment. Unlike plastic flowers, which take hundreds of years to decompose, paper flowers will break down naturally over time.
  • They reduce carbon emissions: Transporting fresh flowers requires a lot of energy, which contributes to carbon emissions. By choosing paper handmade flowers instead, you’re reducing your carbon footprint and doing your part to help combat climate change.

Paper handmade flowers don’t require water.

the-reasons-why-paper-handmade-flower-are-popular-3
Unlike real flowers, paper handmade flowers don’t need water to survive. This makes them ideal for those who want to enjoy the beauty of flowers without having to worry about watering them. Plus, you won’t have to deal with any messy spills or leaks! With a busy person, this is the perfect choice to enjoy beauty without wasting time.

Paper handmade flowers last longer than real flowers.

Real flowers may look stunning, but they don’t last very long. Paper handmade flowers, on the other hand, can last for years if properly cared for. This means that you can enjoy their beauty for much longer, making them a more practical choice in the long run. With handmade paper flowers, if you keep them in good condition, they can last some months, even some years.

How to make paper handmade flower

If you don’t want to buy paper handmade flowers, you can spend time making them by yourself. Creating paper handmade flowers is an enjoyable, eco-friendly, and cost-effective activity that adds a personal touch to any event or home decor. With the plethora of options available, from paper type to flower design and technique, you can easily craft beautiful blooms that suit your taste and style through tutorial videos. By experimenting with different colors, textures, and patterns, you’ll be able to create stunning arrangements that will leave your friends and family impressed with your artistic skills. So, gather your materials, get inspired, and start crafting your very own gorgeous, long-lasting paper flowers today! Don’t forget to share your creations on social media using the hashtag #paperflowers to connect with fellow paper flower enthusiasts and gather even more inspiration.

In conclusion, Camellia Bees provides bella beauty and beast rose for customer who loves art and always enjoy the most natural beauty.

Posted on Leave a comment

5 things you need to know about handmade flowers

Handmade flowers are a beautiful and intricate form of art that has been practiced for centuries. These delicate creations are made from various materials such as paper, fabric, clay, and even metal.

1. The meaning of handmade flowers

The process of making handmade flowers involves cutting, shaping, and assembling individual petals and leaves to create lifelike blooms. The attention to detail and craftsmanship involved in making these flowers is truly remarkable, making handmade flowers a popular choice for home décor, fashion accessories, and special events. Handmade flowers hold a special place in many cultures around the world:
In Mexico: paper flowers are used to decorate altars and graves during the Day of the Dead celebrations.
In Japan: the art of making fabric flowers, known as tsumami kanzashi, is a traditional craft that dates back to the Edo period. These exquisite flowers are often worn as hair ornaments during special occasions.
In Victorian England: handmade flowers are used to convey secret messages through the language of flowers, where each bloom held a specific meaning.

5-things-you-need-to-know-about-handmade-flowers-1

2. The role of handmade flowers

2.1. Handmade flowers create beauty

One of the most appealing aspects of handmade flowers is their versatility. They can be used in various ways, such as:
They are useful for home décor, fashion accessories, and event decorations.
Handmade flowers can be used to create stunning centerpieces, bouquets, and floral arrangements for weddings and other special occasions. They can also be incorporated into clothing, jewelry, and hair accessories, adding a touch of elegance and charm to any outfit.
Furthermore, handmade flowers can be used to embellish gift wrapping, greeting cards, and scrapbooking projects, making them a delightful addition to any craft enthusiast’s collection.

2.2. Handmade flowers are friendly-environmental

Handmade flowers offer an eco-friendly alternative to fresh flowers, which often have a significant environmental impact due to the use of pesticides, water consumption, and transportation.
By choosing handmade flowers, you are not only reducing your carbon footprint but also supporting sustainable practices.
Additionally, handmade flowers are long-lasting and can be reused or repurposed, further minimizing waste and promoting a greener lifestyle.

2.3. Handmade flowers are good for therapy

Creating handmade flowers can be a relaxing and therapeutic activity for many individuals. The process of crafting these intricate blooms requires focus, patience, and creativity, which can help to relieve stress and promote mindfulness. Engaging in this form of art therapy can also boost self-esteem and provide a sense of accomplishment, as you witness your beautiful creations come to life.

3. Types of handmade flowers

3.1. Handmade flowers are categorized by material

Handmade flowers have been a popular form of art and decoration for centuries. These delicate creations can be made from a variety of materials, each offering a unique look and feel.

3.1.1. Paper handmade flowers

5-things-you-need-to-know-about-handmade-flowers-2

Paper handmade flowers are perhaps the most common type of handmade flowers. They can be made from various types of paper, such as tissue paper, crepe paper, or even cardstock. The versatility of paper allows for a wide range of colors, patterns, and textures, making it a popular choice for creating lifelike flowers. Paper flowers can be used for home décor, wedding decorations, or as a thoughtful handmade gift.

3.1.2. Fabric handmade flowers

Fabric flowers are another popular choice for handmade flowers. They can be made from a variety of fabrics, such as silk, cotton, or felt. Fabric flowers offer a soft, delicate appearance and can be used for various purposes, including fashion accessories, home décor, and wedding decorations. The type of fabric chosen can greatly impact the overall look and feel of the flower, allowing for endless customization options.

3.1.3. Clay handmade flowers

Clay flowers are a unique and durable option for handmade flowers. They can be made from various types of clay, such as polymer clay, air-dry clay, or even ceramic clay. Clay flowers can be intricately detailed and painted to resemble real flowers, making them a beautiful addition to home décor or as a long-lasting gift. Due to their durability, clay flowers can also be used for outdoor decorations, such as garden ornaments.

3.1.4. Wooden handmade flowers

Wood handmade flowers are a unique and elegant way to bring the beauty of nature into your home or office. These exquisite pieces of art are crafted by skilled artisans who meticulously carve, shape, and paint each flower to create a stunning and realistic representation of various floral species. The use of wood as a medium adds a touch of warmth and rustic charm to these delicate creations, making them a perfect addition to any interior design style.

3.2. Handmade flowers are categorized by types of flower

3.2.1. Roses: love and passion handmade flowers

Handmade roses are perhaps the most iconic and well-known type of handmade flowers, symbolizing love, passion, and romance. The deep red hue of a handmade rose represents the intensity of one’s feelings, while the delicate petals and intricate design showcase the care and devotion that goes into creating such a beautiful token of affection.

3.2.2. Lilies: purity, grace, and tranquility handmade flowers

Handmade lilies are often associated with purity, grace, and tranquility, making them a popular choice for weddings, funerals, and other solemn occasions. The elegant, trumpet-shaped blooms convey a sense of peace and serenity, while their delicate fragrance adds an air of sophistication and refinement. This is one of the most favorite handmade flowers

how-to-make-calla-lily-paper-flowers-from-crepe-paper-paper

3.3.3. Sunflowers: Happy and admire handmade flowers

With their bright yellow petals and cheerful disposition, handmade sunflowers are a symbol of happiness, admiration, and loyalty. These vibrant handmade flowers are often used to express joy and appreciation, making them a popular choice for celebrations, thank you gifts, and tokens of friendship. The sunflower’s sturdy stem and long-lasting bloom also represent strength and resilience, qualities that are admired and cherished in relationships.

3.3.4. Orchids: luxury and strong handmade flowers

Handmade orchids are synonymous with exotic beauty, luxury, and strength. Their unique and intricate design makes them a captivating choice for those looking to make a bold statement. Often used to symbolize rare and delicate beauty, these handmade flowers are a popular choice for anniversaries, romantic gestures, and expressions of admiration for someone’s strength and individuality.

3.3.5. Daisies: Innocent and simple handmade flowers

Handmade daisies are a charming representation of innocence, playfulness, and simplicity. Their unassuming beauty and cheerful demeanor make them a popular choice for lighthearted celebrations, children’s events, and tokens of friendship. The handmade flowers’s simple design and bright colors convey a sense of joy and optimism, making them a delightful addition to any occasion.